Terranima

What is a guild?

What is a guild? In permaculture, a guild refers to a carefully designed and interconnected group of plants, animals, fungi, and other elements that work together synergistically in a sustainable and productive ecosystem.   The main principle behind guild design is creating a diverse and resilient system, where each element performs multiple functions and supports the overall productivity of the ecosystem.   A permaculture guild typically consists of several key components:   Central Species: At the core of a guild, there is usually a main plant or tree species that serves as the focal point or primary provider of resources. This central species is often a long-lived perennial (for example a tree) that forms the backbone of the guild. Companion Plants: Surrounding the central species are a variety of complementary plants, known as companion plants. These plants are carefully selected to fulfill specific functions that support the overall health and productivity of the guild. They may provide additional resources such as nitrogen fixation, pest control, pollination, nutrient accumulation, or shade regulation. Beneficial insects and animals: Guilds incorporate beneficial insects and animals that play important roles in pest management, pollination, soil aeration, or nutrient cycling. For example, certain plants may attract predatory insects that control pest populations, while flowers can attract pollinators like bees and butterflies. Soil Enhancers: Guilds often include plants or organisms that contribute to soil fertility and health. Nitrogen-fixing plants, such as legumes, convert atmospheric nitrogen into a form that other plants can utilize. Dynamic accumulators, like comfrey or yarrow, draw nutrients from deeper soil layers and make them available to shallower-rooted plants when their leaves decompose. Mulch and / or Ground Covers: Ground covers and mulch plants are employed to protect the soil from erosion, conserve moisture, suppress weeds, and provide organic matter as they decompose. These plants, such as low-growing herbs or spreading perennials, also serve as living mulch, creating microclimates and optimizing resource utilization within the guild.   By carefully selecting and arranging plant species and other components based on their functional relationships, we aim to create self-sustaining and low-maintenance systems that mimic the balance and efficiency of natural ecosystems.  The exact composition of a guild will depend on the specific goals, climate, and local conditions of a particular site. Left picture: Guild around a young olive tree with various perennial herbs and some annual fruit and vegetable plants.   When it comes to guilds with olive trees, there are several companion plants that can be beneficial in enhancing the overall health and productivity of the olive tree ecosystem.   Picture at the right: view of the companion plants we chose for our olive tree. Other good companion plants for an olive tree guild could be: Borage (Borago officinalis), Fennel (Foeniculum vulgare), Marigold (Tagetes spp.), Nasturtium (Tropaeolum spp.). I. Comfrey (Symphytum spp.): Comfrey is an accumulator plant and known for its deep taproots that can mine nutrients from deep in the soil. It accumulates minerals and makes them available to other plants, making it an excellent choice for almost any type of guild. Its huge leaves create lots of shade and help suppress unwanted weeds. Note: We have placed the comfrey in the shade of the olive tree (north side) as it still is difficult to grow comfrey in our climate. Comfrey generally prefers half-shade and cooler temperatures. With a thick woodchip mulch layer, which is reducing surface temperature considerably, we hope that the comfrey will thrive here.   II. Lavender (Lavandula spp.): Lavender attracts pollinators and beneficial insects while repelling pests. Its aromatic foliage can also help deter pests from olive trees. III. Thyme (Thymus spp.): Thyme is a low-growing herb that can act as a living mulch around the base of olive trees, suppressing weeds and conserving moisture. It also attracts pollinators and repels certain pests. IV. Rosemary (Rosmarinus officinalis): Rosemary is a hardy herb that can thrive in the same conditions as olive trees. It attracts bees and other beneficial insects while providing some shade to the soil around the tree.   V. Ballota (Ballota acetabulosa): The flowers of this herbaceous plant are attractive for bees and when big enough, the leaves will work as a ground cover. VI. Incense (Plectranthus madagascariensis): Incense attracts insects, pollinators and butterflies and therefore also birds to the garden.The leaves and branches of this species give off a strong scent and are sometimes used to ward off flies. We’re hoping to keep away the nasty flies that puncture the olives! VII. Sugar melon (Cucumis melo): This melon is an experiment – we are very curious as to how well annual vegetables can do around an olive tree. So far, the plant looks quite happy, growing a first little melon. With its beautiful flowers, this melon will attract pollinators and create shade / ground cover with its big leaves Remember to consider the specific growing conditions, climate, and region when selecting companion plants for your guild. It’s also beneficial to choose plants that have similar water and sunlight requirements to ensure they thrive together.

What is a guild? Read More »

Building our composting area

Building our composting area Compost production is at the heart of our regenerative practices and having a proper space to produce it seemed an important milestone in our journey.   It all started from the wish to professionalize our compost production. At the beginning, we were making our compost outside, having to protect our piles from sun, wind, and rain. A fully covered area would give us the benefit of working in the shade and protect our fresh piles and the finished product from too much heat, wind or humidity. All of which contributes to a better product in the end: a rich, dark compost, that is full with microbial life. It all starts with a rough sketch… So, the task at hand was to construct a spacious, covered area that would allow us to have more control over the entire process while making our lives a bit easier at the same time. We always try to design our systems with a permaculture approach – each element performs many functions. Thus, the new building should not only help us to produce compost, protect us and the compost from the elements but should also integrate in the existing systems. That’s why the “relative location” of each element is crucial. By placing it right next to (and one terrace level up from) the main garden, we can choose to gravity-feed our veggie garden by connecting the liquid compost tank to the irrigation system. This way, we save ourselves a lot of time and effort. Future plans involve adding animal stables right next to the compost area, which is another example of a “relative location”. The need for fresh manure in our compost production makes the placement of animal stables right next to it a smart choice. The building process After having found the right location, we started out with a rough sketch, some measuring, and the help of many volunteers. We had to select the right logs for the pillars, shave the bark off of them and bury them 1m deep in the compacted clay soil. Picture at the right shows the first task completed: Coco and Chris are celebrating the accomplished burying and aligning of the pillars. Now that the pillars were in place, we started to connect them with horizontal crossbeams. On top of these connectors, we had to fix other logs using simple joinery. Even though it was basic woodworking, the irregularity of roundwood has got its challenges. Nevertheless, we were determined to spend as little money as possible (as opposed to buying more processed – meaning square – pillars and beams) and we simply love the “rinky-dinky” style of building with roundwood. As soon as the main structure was up, we could cover the roof. We decided on rough boards from locally sourced Douglas firs. To protect the roof from rain, we used overlapping rows of tar paper. We heated the tar paper at the edge where the rows overlap in order to glue them together properly. Finally, it was time to take care of the work area itself. After some debating whether to use cement or not, we’ve decided to pour a cement floor for half of the building. We wanted a flat and clean workspace for storing the finished compost and more importantly, placing the brewing tank for our liquid compost production. We boarded up the walls on the two “wheater sides”, to protect from winds and precipitation from north and west. Leaving enough space on top of every wall would grant us enough natural light and also lessen the wind pressure on the structure. All we had to do now was installing water and power lines and build a wooden platform to carry our 600lt tank. We’ve also included a ladder and service platform on top of it to be able to easily access and clean the residues inside the tank after each brewing process. We’ve already used it many times and it works perfectly! The elevated platform provides some altitude to empty the tank without any pump or power, simply using gravity. In the future, we’re planning to install a wind turbine and batteries to hopefully generate enough electricity for the air pumps, which are needed to produce a high-quality liquid compost (tea & extracts). Another future project is to harvest the rain water from the roof to further minimize the environmental impact in our compost production. Surely, we’ll be looking for the best possible “relative location” of the rainwater catchment system to ensure that it’ll be also adhering to the permaculture principle of “each element performs many functions”. For now, we’re super thrilled to be able to work efficiently and produce one of our main assets, a dark, rich, microbially active compost in larger quantities.   This will speed up the regeneration process of all the parts of our land, be it the olive groves, the food forest, or our veggie gardens.

Building our composting area Read More »

More fruit trees – Starting a food forest!

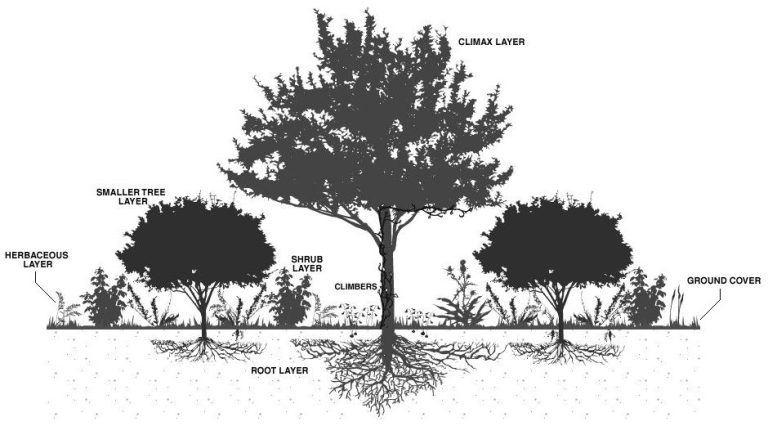
Building our food forest A Food Forest Takes Root The land came to us already generous — an old orchard planted by Teresa Fiorenza. Here’s how we began turning it into a food forest: swales, saplings, and compost alive with fungi. This piece of land came to us already generous. For years it has given us medicinal herbs, fruit and all kinds of edible plants — most of them put in the ground long ago by the previous owner, Teresa Fiorenza, a gentle old woman who likely lived through hard years during and after the Second World War. Thank you, Teresa. We inherited an abundance of perennials and trees: loquat, artichokes, mulberries, dates, peaches, plums, apricots, almonds, figs, pears, apples, persimmon (kaki), jujube, pomegranates, walnuts, hazelnuts, lemons, oranges, mandarins, citron (cedro) and bergamot. There are few luxuries quite like eating fruit still warm from the tree. But it doesn’t stop there. Continuing Teresa’s legacy — and our own path toward self-sufficiency — we began planting new trees around the house: the sub-tropical Moringa oleifera and carob (Ceratonia siliqua), along with some fig and oak. New trees for the future food forest. Young carob sapling. The best time to plant a tree was 20 years ago. The second best time is now.— Chinese proverb In the older orchard we added two varieties of apricot, two of apple, quince, flat peach (Prunus persica var. platycarpa), regular peach, mulberry and plum. Along a cliff, in a more shaded spot, went white, red and black currant, red gooseberry, blueberry and raspberry. On the flatter part of the future food forest we shaped swales — a trench-and-berm running along the contour (a line of equal altitude) to catch and hold as much rainwater as possible for the trees. Ours are really semi-swales: interrupted, and not perfectly on contour. Aerial view of the food forest area, showing potential water collection in the swales (in blue). Tree planting The future food forest, with freshly dug swales. We dug the planting holes on the uphill side of each swale, roughly 40–50 cm deep and wide — big enough for the roots to grow on before they meet the native soil, which tends to be more compacted. Each tree gets more water this way: the swale’s ditch lets surface run-off infiltrate straight into the root zone. Planting hole. To give the young trees a head start, we layered seasoned compost between the native soil. The point of adding our own compost is to inoculate the ground with the most diverse microbiology we can — beneficial bacteria and, above all, beneficial fungi. This is the main reason we set up our Soil Lab. Under the microscope we can judge the quality of our own compost and soil, and identify which members of the Soil Food Web are present — the beneficial ones, and the ones we’d rather not see. It lets us make better decisions. For the trees, we used a compost richer in fungi than in bacteria. Trees sit later in ecological succession, and later-succession plants tend to take their nitrogen as ammonium (NH₄⁺) rather than nitrate (NO₃⁻). Fungal-dominated soils hold nitrogen in that ammonium form; bacterial-dominated soils tip it toward nitrate — which is exactly what early-succession plants and most weeds prefer. Matching the soil’s biology to the plant is the whole game. Adding a rich mix to the planting hole — seasoned compost and topsoil. Before setting each sapling in, we carefully teased open the root ball once it was out of its pot, to prevent girdling. Loosening the root ball matters for how the roots develop. What is “girdling”? In nursery pots, roots hit the wall and start circling. Loosening the root ball breaks that circling habit, so the tree is far less likely to keep spiralling once it’s planted. We also dug square holes, hoping a few roots would find a corner and cross more easily from hole to native soil. Finally, we drove three fence posts into the ground around each sapling (careful not to spear the root ball). Once the summer drought sets in and the drip irrigation comes on, the wild boars will smell the water at once — there’s little of it around in summer — and mistake a damp swale for a ready-made mud bath. Rolling around happily in it, they can damage or even uproot a young tree. Here’s hoping the posts keep the saplings safe. Creating a “food forest” (or “edible landscape”) What is a food forest? A food forest — or forest garden — is a diverse planting of edible species that imitates the patterns and relationships of a natural ecosystem. It’s a three-dimensional design, with life reaching in every direction: up, down and out. Once established, it doesn’t need replanting year after year, and it’s generally very resilient. Source: Resurgent Circles – Seeding Eden (modified by us). We usually speak of seven layers in a forest garden: the overstorey (canopy), the understorey (smaller trees), the shrub layer, the herbaceous layer (grasses, medicinal plants and so on), the ground-cover layer (perennials like clover), the root layer (root vegetables) and the vine layer (climbers). Some add an eighth — the mycelial layer, the mushrooms. Stacking these layers lets us fit far more plants into one area without them failing from competition. The food forest area, marked with a red dotted line. A food forest has to be organic. Forest gardens lean heavily on a healthy ecosystem; they can’t be sprayed with herbicides or pesticides, or fed synthetic fertilisers. That ecosystem takes several years to settle in — so we have to be patient and let nature do its work, while providing the food, water and habitat every part of it needs. Without those, they simply won’t come. Food forests are a new idea in our corner of Calabria, but people have been growing them for thousands of years elsewhere in the world. Adding some seasoned high-fungal compost to an orange tree. A well-designed forest garden earns its

More fruit trees – Starting a food forest! Read More »

en_USEN