
More fruit trees – Starting a food forest!
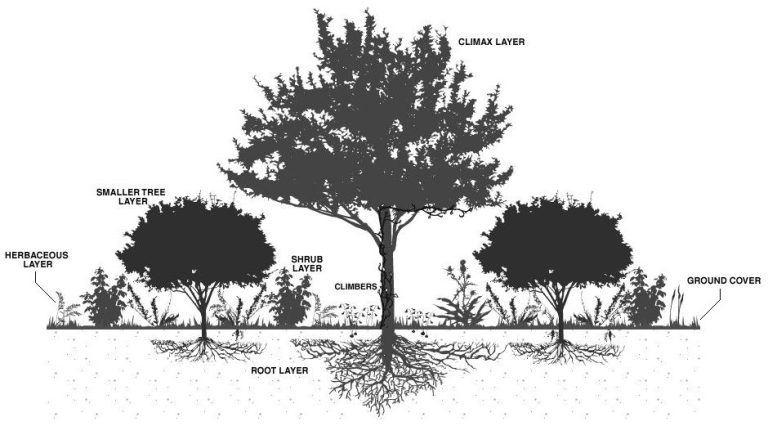
Building our food forest A Food Forest Takes Root The land came to us already generous — an old orchard planted by Teresa Fiorenza. Here’s how we began turning it into a food forest: swales, saplings, and compost alive with fungi. This piece of land came to us already generous. For years it has given us medicinal herbs, fruit and all kinds of edible plants — most of them put in the ground long ago by the previous owner, Teresa Fiorenza, a gentle old woman who likely lived through hard years during and after the Second World War. Thank you, Teresa. We inherited an abundance of perennials and trees: loquat, artichokes, mulberries, dates, peaches, plums, apricots, almonds, figs, pears, apples, persimmon (kaki), jujube, pomegranates, walnuts, hazelnuts, lemons, oranges, mandarins, citron (cedro) and bergamot. There are few luxuries quite like eating fruit still warm from the tree. But it doesn’t stop there. Continuing Teresa’s legacy — and our own path toward self-sufficiency — we began planting new trees around the house: the sub-tropical Moringa oleifera and carob (Ceratonia siliqua), along with some fig and oak. New trees for the future food forest. Young carob sapling. The best time to plant a tree was 20 years ago. The second best time is now.— Chinese proverb In the older orchard we added two varieties of apricot, two of apple, quince, flat peach (Prunus persica var. platycarpa), regular peach, mulberry and plum. Along a cliff, in a more shaded spot, went white, red and black currant, red gooseberry, blueberry and raspberry. On the flatter part of the future food forest we shaped swales — a trench-and-berm running along the contour (a line of equal altitude) to catch and hold as much rainwater as possible for the trees. Ours are really semi-swales: interrupted, and not perfectly on contour. Aerial view of the food forest area, showing potential water collection in the swales (in blue). Tree planting The future food forest, with freshly dug swales. We dug the planting holes on the uphill side of each swale, roughly 40–50 cm deep and wide — big enough for the roots to grow on before they meet the native soil, which tends to be more compacted. Each tree gets more water this way: the swale’s ditch lets surface run-off infiltrate straight into the root zone. Planting hole. To give the young trees a head start, we layered seasoned compost between the native soil. The point of adding our own compost is to inoculate the ground with the most diverse microbiology we can — beneficial bacteria and, above all, beneficial fungi. This is the main reason we set up our Soil Lab. Under the microscope we can judge the quality of our own compost and soil, and identify which members of the Soil Food Web are present — the beneficial ones, and the ones we’d rather not see. It lets us make better decisions. For the trees, we used a compost richer in fungi than in bacteria. Trees sit later in ecological succession, and later-succession plants tend to take their nitrogen as ammonium (NH₄⁺) rather than nitrate (NO₃⁻). Fungal-dominated soils hold nitrogen in that ammonium form; bacterial-dominated soils tip it toward nitrate — which is exactly what early-succession plants and most weeds prefer. Matching the soil’s biology to the plant is the whole game. Adding a rich mix to the planting hole — seasoned compost and topsoil. Before setting each sapling in, we carefully teased open the root ball once it was out of its pot, to prevent girdling. Loosening the root ball matters for how the roots develop. What is “girdling”? In nursery pots, roots hit the wall and start circling. Loosening the root ball breaks that circling habit, so the tree is far less likely to keep spiralling once it’s planted. We also dug square holes, hoping a few roots would find a corner and cross more easily from hole to native soil. Finally, we drove three fence posts into the ground around each sapling (careful not to spear the root ball). Once the summer drought sets in and the drip irrigation comes on, the wild boars will smell the water at once — there’s little of it around in summer — and mistake a damp swale for a ready-made mud bath. Rolling around happily in it, they can damage or even uproot a young tree. Here’s hoping the posts keep the saplings safe. Creating a “food forest” (or “edible landscape”) What is a food forest? A food forest — or forest garden — is a diverse planting of edible species that imitates the patterns and relationships of a natural ecosystem. It’s a three-dimensional design, with life reaching in every direction: up, down and out. Once established, it doesn’t need replanting year after year, and it’s generally very resilient. Source: Resurgent Circles – Seeding Eden (modified by us). We usually speak of seven layers in a forest garden: the overstorey (canopy), the understorey (smaller trees), the shrub layer, the herbaceous layer (grasses, medicinal plants and so on), the ground-cover layer (perennials like clover), the root layer (root vegetables) and the vine layer (climbers). Some add an eighth — the mycelial layer, the mushrooms. Stacking these layers lets us fit far more plants into one area without them failing from competition. The food forest area, marked with a red dotted line. A food forest has to be organic. Forest gardens lean heavily on a healthy ecosystem; they can’t be sprayed with herbicides or pesticides, or fed synthetic fertilisers. That ecosystem takes several years to settle in — so we have to be patient and let nature do its work, while providing the food, water and habitat every part of it needs. Without those, they simply won’t come. Food forests are a new idea in our corner of Calabria, but people have been growing them for thousands of years elsewhere in the world. Adding some seasoned high-fungal compost to an orange tree. A well-designed forest garden earns its
More fruit trees – Starting a food forest! Read More »
 EN
EN  IT
IT